
Route Changes & Adjustments Effective February 2, 2025
Ride the SunRunner! With service every 15 minutes from 6 a.m. - 8 p.m. and 30 minutes from 8 p.m. - midnight.
Standard Routes
Select a route
- Route 4
- Route 5
- Route 7
- Route 9
- Route 11
- Route 14
- Route 15
- Route 16
- Route 18
- Route 18 (PCPT)
- Route 19
- Route 19 (PCPT)
- Route 20
- Route 22
- Route 23
- Route 32
- Route 34
- Route 38
- Route 52/52LX
- Route 58
- Route 59
- Route 60
- Route 61
- Route 62
- Route 65
- Route 66L
- Route 67
- Route 68
- Route 73
- Route 74
- Route 75
- Route 76
- Route 78
- Route 79
- Route 90
- Route 100X
- Route 203 Skyway Connexion (MCAT)
- Route 300X
- Route 812
- Central Avenue Trolley
- Downtown Looper
- East Lake Shuttle
- Jolley Trolley Beach Route (PSTA passes accepted)
- Jolley Trolley Coastal Route (PSTA passes accepted)
- Suncoast Beach Trolley℠
- SunRunner
Regional Express Routes
Select a route
Trolley Services
Select a route
Additional Links
Links to Other Systems in the Region
Download the Flamingo Fares App
Available on: Google Play | App Store
Visit FlamingoFares.com for more information.
Below is a list of our most popular fares.
Regular Cash Fare
$2.25
Reduced Cash Fare
$1.10
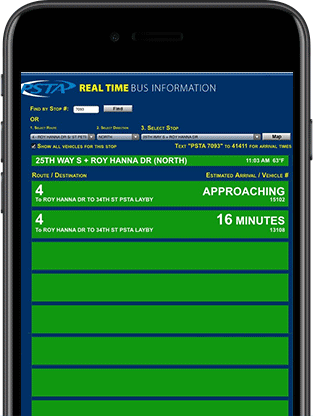
WHERE'S MY BUS?
Introducing the Real Time Bus Information.
PSTA invites you to experience Real Time Bus Information. The system works with GPS technology and allows PSTA to pinpoint each vehicles exact location at all times. This means we can provide reliable, real-time departure information to passengers.
Page Not Found
Sorry! We couldn't find the page you were looking for. You may have mistyped the address or the page may have moved.