
Connected Community Bus Network is now live!
See the New Routes
Standard Routes
- Route 4
- Route 5
- Route 9
- Route 11
- Route 16
- Route 18
- Route 19
- Route 20
- Route 22
- Route 24
- Route 29
- Route 34
- Route 38
- Route 49
- Route 52
- Route 54
- Route 58
- Route 59
- Route 60
- Route 61
- Route 62
- Route 65
- Route 66
- Route 70
- Route 73
- Route 74
- Route 78
- Route 90
- Route 91
- Route 100
- Route 203 Skyway Connexion (MCAT)
- Route 300
- Central Avenue Trolley
- Downtown Looper
- East Lake Shuttle
- Jolley Trolley North Beach Route (PSTA passes accepted)
- Jolley Trolley South Beach Route (PSTA passes accepted)
- Jolley Trolley Coastal Route (PSTA passes accepted)
- Suncoast Beach Trolley℠
- SunRunner
- Spark
Regional Express Routes
Trolley Services
Additional Links
Links to Other Systems in the Region
Download the Flamingo Fares App
Available on: Google Play | App Store
Visit FlamingoFares.com for more information.
Below is a list of our most popular fares.
Regular Cash Fare
$2.25
Reduced Cash Fare
$1.10
WHERE'S MY BUS?
Introducing the Real Time Bus Information.
PSTA invites you to experience Real Time Bus Information. The system works with GPS technology and allows PSTA to pinpoint each vehicles exact location at all times. This means we can provide reliable, real-time departure information to passengers.
Take Your Bike Along for the Ride
Bikes on Buses
Whether you use a bike for transportation or recreation, or commute to work, your bike on the bus may be just the ticket.
All it takes is a few minutes with a “how-to” video and some simple bike-loading instructions.
Before Your Bike Enters the Fast Lane, Here's a Few Rules of the Road:
- Loading and securing the bike onto the rack is the sole responsibility of the cyclist. Bikes may not be locked to the rack.
- Up to two bicycles bikes can be loaded on the rack. Only single-seat, two-wheel bicycles are allowed. Motor-powered vehicles, bikes smaller than 16", and bikes with covered spokes are not allowed.
- Folding bikes are allowed on the bus, as long as they are folded and stored out of the aisle.
- PSTA is not responsible for damage to bicycles bikes or related property, except in the event that PSTA is found to be negligent or at fault in an accident. Theft, damage or, injury while loading and/or unloading are the sole responsibility of the passenger/cyclist, not PSTA.
- Before you exit, remember to tell the driver that you have a bike on the bus.
- If the bike rack on your route is full on the last trip of the day, you may bring your bike inside the bus.

Step 1: Lowering the Rack
Always load your bike from the curbside. Lower the rack with one hand.
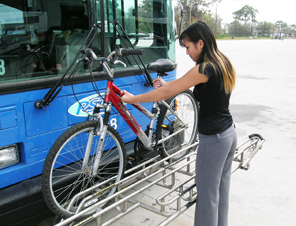
Step 2: Loading Your Bike
Lift the bike into either of the rack's wheel wells. Each position on the rack is labeled for front and rear wheel.

Step 3: Securing Your Bike
Lift the support arm up over the front tire. Make sure the support arm is resting on the top of the tire and not on the fender or frame.